
Animation Guide
Rayscaper renders animations by moving the camera through your SketchUp scenes. This guide goes from setting up the scenes in SketchUp to the rendered frames and the video you make of them.
Render an animation renders an animation from the scene tabs of a garden studio: the tabs as keyframes with the transition times set in SketchUp, the Render Animation dialog with its output folder, frame rate and draft overrides, Animate Shadows to move the sun from one scene to the next, and the numbered frames to turn into a video. To follow along, download its scene, rayscaper-animation.skp (9.5 MB): a garden studio with four scene tabs. It works with the free version of Rayscaper.
How Animation Works
Section titled “How Animation Works”Your SketchUp scenes (also called “pages”) are the keyframes. When you render an animation:
- Rayscaper interpolates the camera between scenes.
- If you ask for it, it moves the sun between scenes too.
- Every frame is rendered and saved as a numbered PNG file:
animation_0000.png,animation_0001.pngand so on.
Scene 1 ──── transition frames ────> Scene 2 ──── transition frames ────> Scene 3You then combine the frames into a video with software like Adobe Premiere, DaVinci Resolve (free version available), or FFmpeg.
Step 1: Create SketchUp Scenes
Section titled “Step 1: Create SketchUp Scenes”Each SketchUp scene captures a camera position that becomes a keyframe of your animation.
- In SketchUp, position your camera where you want the first shot
- Go to View > Animation > Add Scene (or right-click a scene tab and select Add)
- Move to your next camera position and add another scene
- Repeat until you have all the camera positions you want
- You need at least two scenes to create an animation
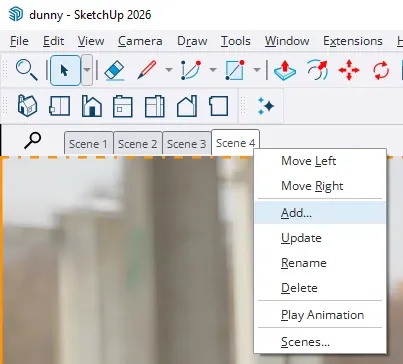
Right-click a scene tab to access scene options including Add, Update, and Play Animation.
Configuring Scene Timings
Section titled “Configuring Scene Timings”Each scene has timing settings that control how long the camera stays at that position and how long it takes to move to the next scene.
To configure scene timings in SketchUp:
- Open the Scenes panel (Window > Scenes or Window > Default Tray > Scenes)
- Select a scene and click the Show Details button (small arrow icon)
- Configure the timing options:
- Delay: How long the camera stays at this scene (in seconds)
- Transition: How long it takes to move into this scene from the previous one (in seconds)
You can also set default timings for all scenes:
- Go to Window > Model Info
- Select Animation from the sidebar
- Set the default Scene Delay and Scene Transition times
- Enable scene transitions only affects the animation that SketchUp itself plays. Rayscaper always renders the transitions, using the transition times
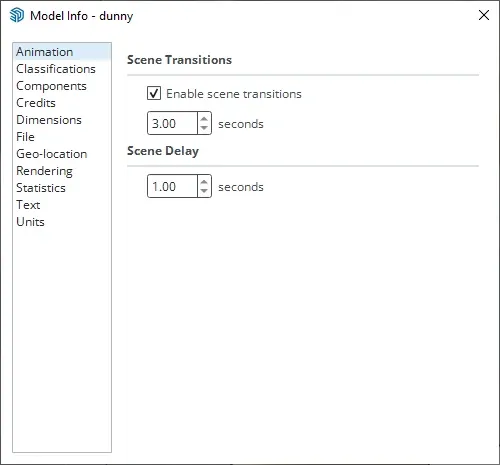
Model Info Animation settings. These defaults apply to all scenes unless overridden individually.
Including Scenes in Animation
Section titled “Including Scenes in Animation”Not all scenes need to be part of your animation. For each scene, you can choose whether to include it:
- Open the Scenes panel
- Right-click on a scene tab or select the scene in the panel
- Check or uncheck Include in animation
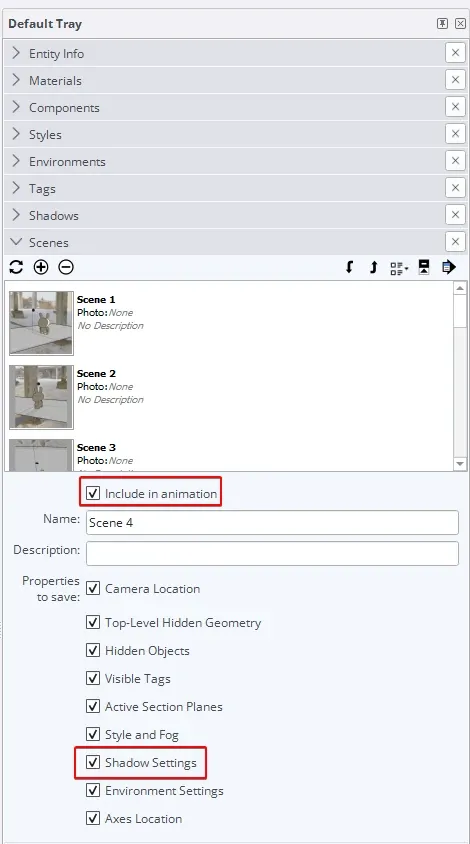
The Scenes panel with properties expanded. Check “Include in animation” and “Shadow Settings” under Properties to save.
Only scenes marked with “Include in animation” will be rendered. You need at least two included scenes to create an animation.
Step 2: Configure Sun Animation (Optional)
Section titled “Step 2: Configure Sun Animation (Optional)”Rayscaper can move the sun between scenes, for a time-lapse with moving shadows: a building at different times of day, a sunrise or sunset, or the light moving through a room during the day.
Enable the SketchUp Sun light
Section titled “Enable the SketchUp Sun light”The sun animation moves the SketchUp Sun directional light, which follows SketchUp’s shadow settings. Turn it on first:
- With Rayscaper open, go to Extensions > Rayscaper in SketchUp
- Click Use SketchUp Sun for Directional Light to enable it (a checkmark will appear)
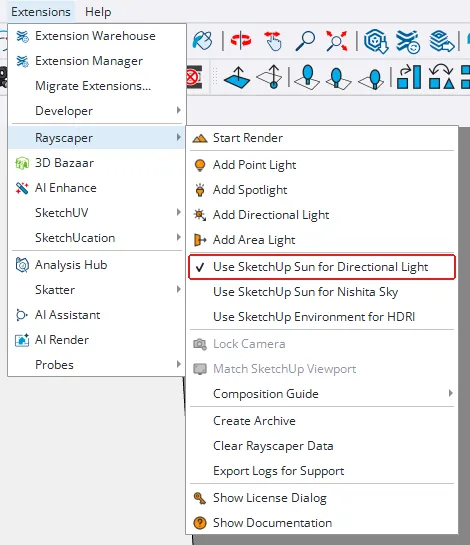
Enable “Use SketchUp Sun for Directional Light” in the Extensions > Rayscaper menu.
Configure Shadow Settings per Scene
Section titled “Configure Shadow Settings per Scene”For sun animation to work, each scene must also save its shadow settings in SketchUp:
- Open the Scenes panel and select a scene
- Click Show Details to expand scene properties
- Check Shadow Settings under “Properties to save”
- Open the Shadows panel (Window > Shadows)
- Set the date and time for this scene’s sun position
- Right-click the scene tab and select Update
- Repeat for each scene with different sun positions
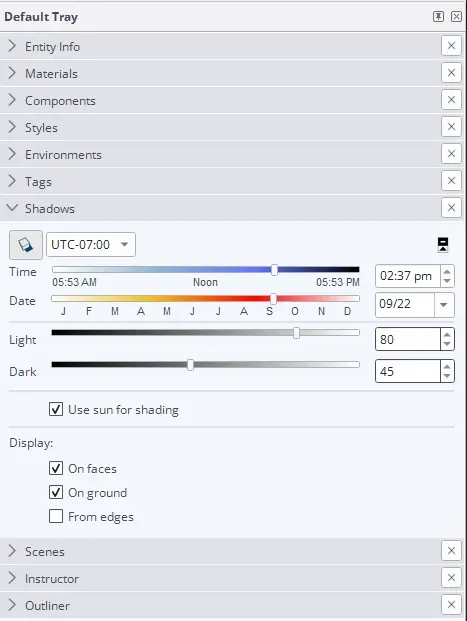
The Shadows panel. Use the Time and Date sliders to set the sun position for each scene.
Tips for Sun Animation
Section titled “Tips for Sun Animation”- For a full day, create scenes at key times: morning, noon, afternoon and evening. The sun moves smoothly between them.
- Set the date as well as the time, since the sun’s path depends on the season.
Step 3: Open the Animation Dialog
Section titled “Step 3: Open the Animation Dialog”With the scenes set up in SketchUp, configure the animation in Rayscaper.
- Click Start Render on the Rayscaper toolbar or in the Extensions > Rayscaper menu
- Go to File > Render Animation in Rayscaper’s menu
- The Animation Rendering dialog opens
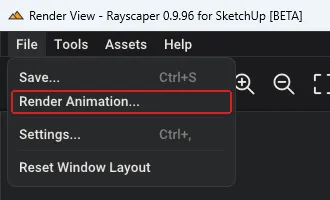
Open the animation dialog from File > Render Animation.
Step 4: Configure Animation Settings
Section titled “Step 4: Configure Animation Settings”The animation dialog has several sections to configure your render.
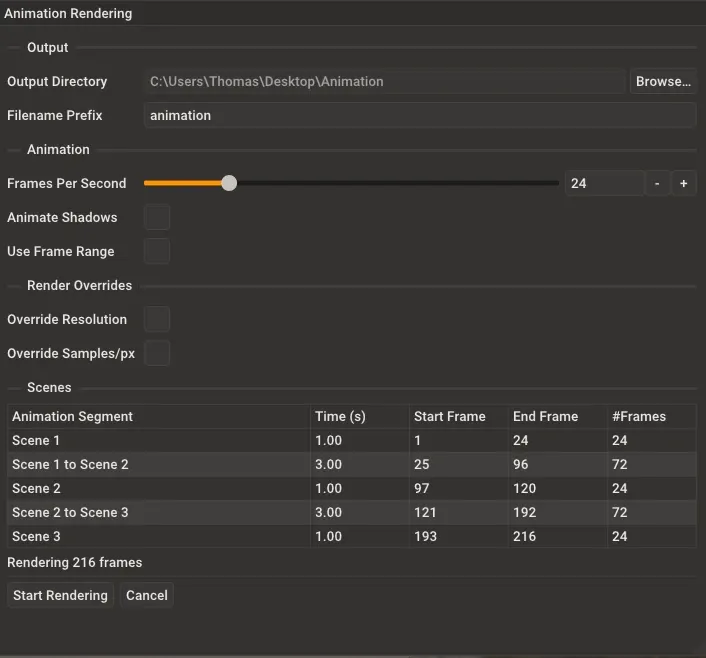
The Animation Rendering dialog with all configuration options.
Output Settings
Section titled “Output Settings”Output Directory: Choose where to save the rendered frames. Click the Browse button to select a folder. Make sure the folder exists and you have write permission.
Filename Prefix: The base name for your frame files. For example, if you enter my_animation, frames will be named my_animation_0000.png, my_animation_0001.png, etc.
Animation Settings
Section titled “Animation Settings”Frames Per Second (FPS): Controls how many frames are rendered per second of animation time. Common values:
- 24 fps: Film standard, good balance of smoothness and render time
- 30 fps: Video standard, slightly smoother motion
- 60 fps: Very smooth, but doubles render time compared to 30 fps
Higher FPS means more frames to render. For example, a 10-second animation requires 240 frames at 24 fps, but 600 frames at 60 fps.
Animate Shadows: moves the SketchUp Sun light from one scene’s shadow settings to the next.
Use Frame Range: Optionally render only a portion of your animation. This is useful for:
- Test rendering a specific section
- Re-rendering frames that had issues
- Breaking a long animation into segments
When enabled, specify the Start Frame and End Frame to render. The dialog counts frames from 1, while the file names count from 0: frame 1 is saved as animation_0000.png.
Render Quality Overrides
Section titled “Render Quality Overrides”These options override the render settings for the animation, for a quick draft before the full-quality render.
Override Resolution: Render at a different resolution than your current camera settings. Lower resolutions render faster.
Without an active license, animation frames rendered inside SketchUp are limited to 1280 pixels on the longest edge, including when Override Resolution requests a larger size. The override keeps your requested dimensions. Animations have no duration limit. See licensing.
Override Samples/Pixel: Use fewer samples per pixel for faster (but noisier) renders. Great for draft animations.
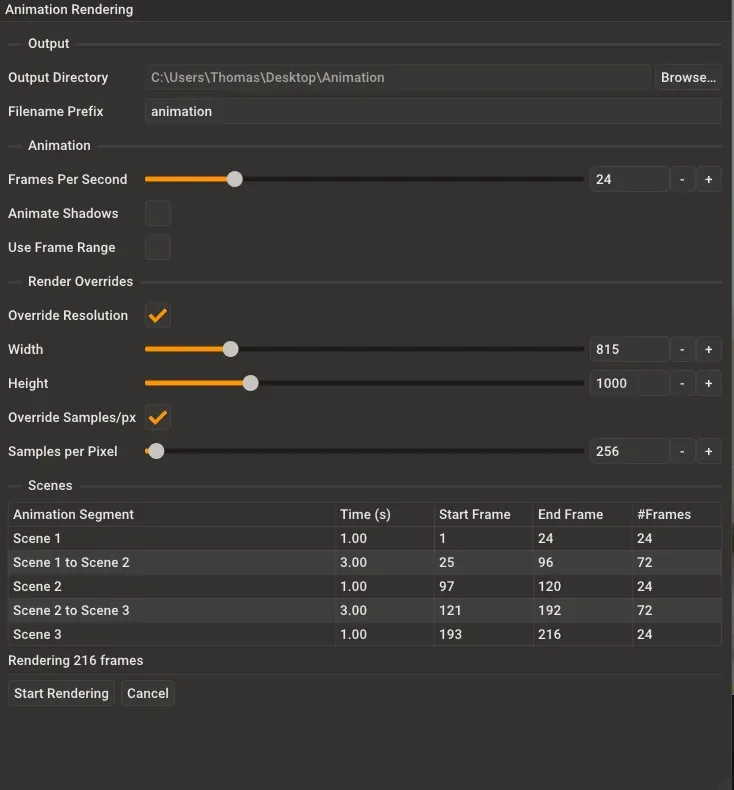
Render overrides expanded. Lower resolution and samples for faster draft renders.
Scene Preview
Section titled “Scene Preview”The dialog shows a table of all scenes included in your animation with their timings:
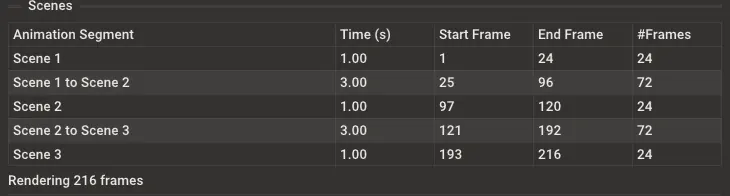
The Scenes table shows each scene and transition with timing and frame information.
| Column | Description |
|---|---|
| Animation Segment | The scene name or transition between scenes |
| Time (s) | Duration in seconds |
| Start Frame | First frame number of this segment |
| End Frame | Last frame number of this segment |
| #Frames | Total frames in this segment |
Check here that the timing is what you want before you start.
Step 5: Start Rendering
Section titled “Step 5: Start Rendering”Once everything is configured:
- Review the estimated total frame count at the bottom of the dialog
- Click Start Rendering
- The dialog switches to show render progress
During Rendering
Section titled “During Rendering”The progress view shows:
- Progress bar: Visual indication of overall completion
- Frame Number: Current frame being rendered
- Total Frames: Total frames in the animation
- Elapsed Time: How long the render has been running
- Remaining Time: Estimated time until completion
- Output File: Path to the most recently saved frame
- Overrides: Any resolution or sample overrides in effect
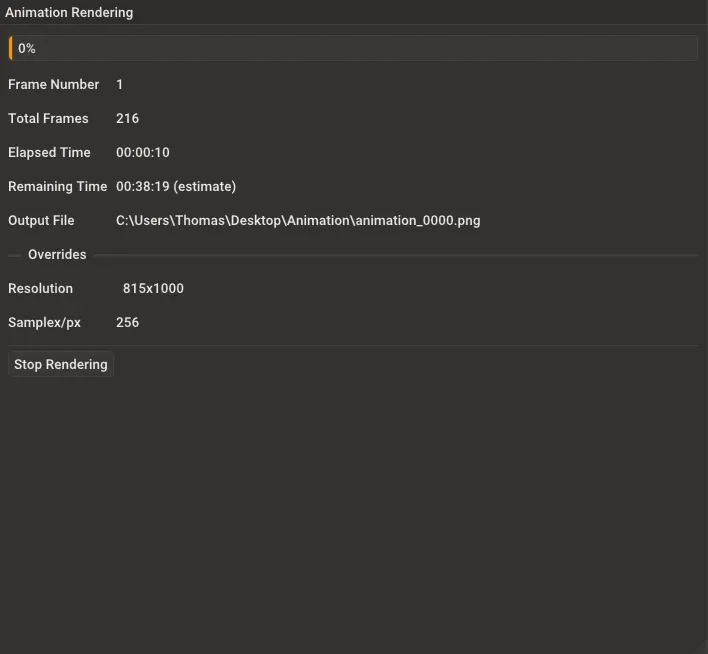
The progress dialog during rendering. Click Stop Rendering to cancel at any time.
You can click Stop Rendering at any time to cancel the animation. Frames that have already been saved will remain on disk.
When the last frame is saved, the dialog shows Animation rendering completed! with the total number of frames, the total render time and the output directory. Click Close to return to the render window.
Step 6: Create Your Video
Section titled “Step 6: Create Your Video”The output folder now holds the numbered PNG frames. Video editing or encoding software turns them into a video.
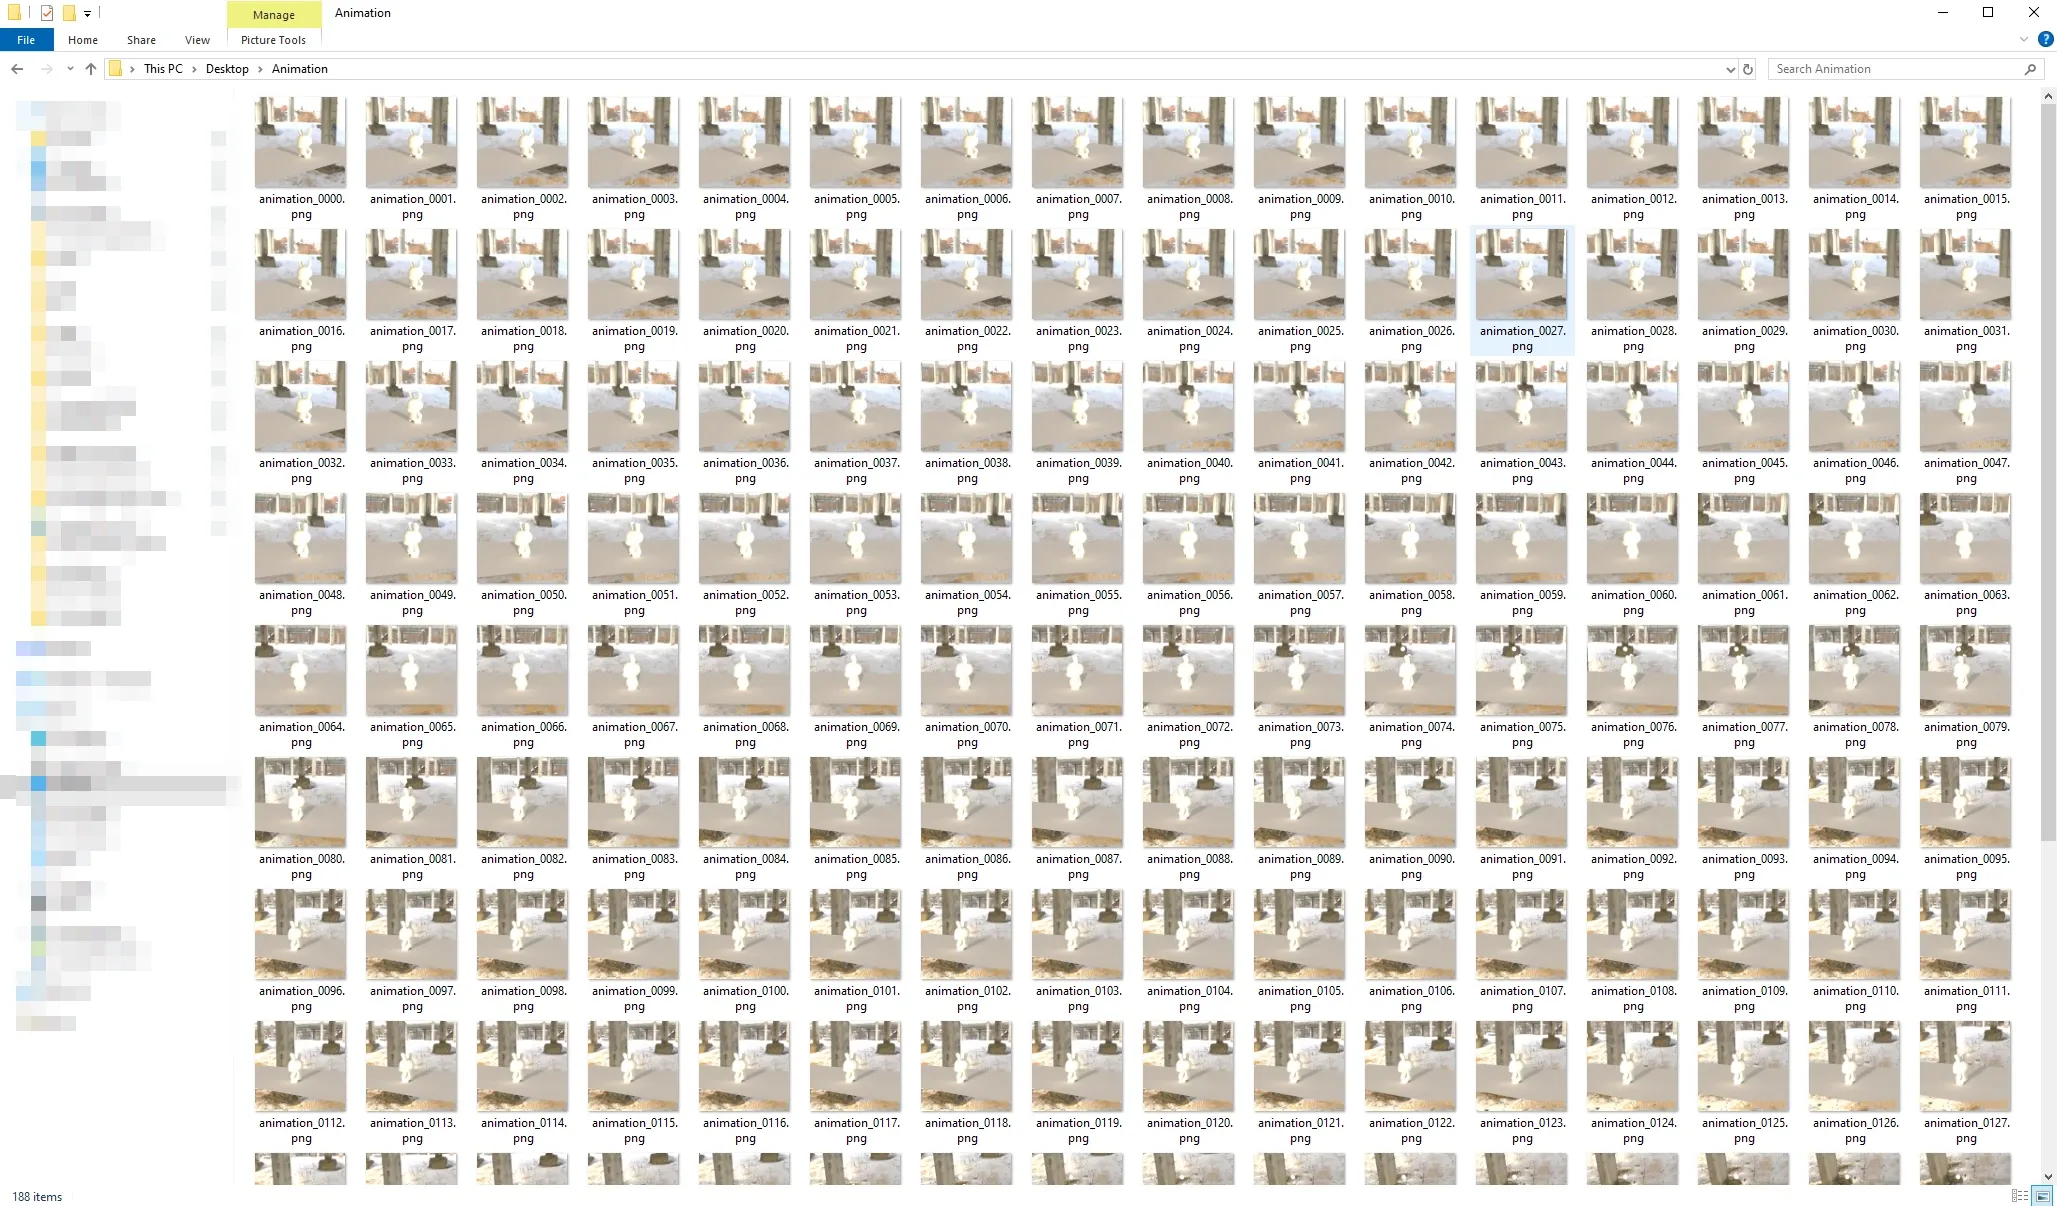
The output folder with rendered frames. Each frame is numbered sequentially.
Using FFmpeg (Free)
Section titled “Using FFmpeg (Free)”FFmpeg is a free command-line tool that combines an image sequence into a video:
ffmpeg -framerate 24 -i animation_%04d.png -c:v libx264 -pix_fmt yuv420p output.mp4Adjust -framerate to match your animation’s FPS setting.
If you rendered only part of the animation with Use Frame Range, the first file isn’t animation_0000.png. Tell
FFmpeg where to start with -start_number, placed before -i. For frames 121 to 240, whose files are numbered 0120 to
0239:
ffmpeg -framerate 24 -start_number 120 -i animation_%04d.png -c:v libx264 -pix_fmt yuv420p output.mp4Using Video Editors
Section titled “Using Video Editors”Import the image sequence into your preferred video editor:
- Adobe Premiere: File > Import, select first image, check “Image Sequence”
- DaVinci Resolve (free version available): Media Pool > Import Media, navigate to folder, select frames
- After Effects: File > Import > File, select first image, check “PNG Sequence”
Open Source Alternatives
Section titled “Open Source Alternatives”- Kdenlive: Project > Add Clip, select frames, right-click and choose “Add Clip to Timeline”
- Blender: In the Video Sequence Editor, Add > Image Sequence, select frames
Set your project frame rate to match the animation’s FPS for proper playback speed.
Troubleshooting
Section titled “Troubleshooting””At least two scenes marked for animation are required”
Section titled “”At least two scenes marked for animation are required””You need at least two SketchUp scenes with “Include in animation” checked. Open the Scenes panel in SketchUp and ensure at least two scenes are included.
”Output directory is not writable”
Section titled “”Output directory is not writable””The selected output folder either doesn’t exist or you don’t have permission to write to it. Create the folder first, or choose a different location.
”Animate Shadows” option is not visible
Section titled “”Animate Shadows” option is not visible”The “Animate Shadows” checkbox only appears if you have Use SketchUp Sun for Directional Light enabled in Rayscaper. Go to the Rayscaper menu in SketchUp and click “Use SketchUp Sun for Directional Light” to enable it.
Shadows aren’t animating
Section titled “Shadows aren’t animating”Make sure:
- Use SketchUp Sun for Directional Light is enabled in the Rayscaper menu (in SketchUp)
- Animate Shadows is checked in the animation dialog
- Each scene has Shadow Settings checked in its properties
- You’ve set different times in the Shadows panel for each scene
- You right-clicked and chose Update after changing shadow settings
Animation is too fast or too slow
Section titled “Animation is too fast or too slow”Adjust the scene delay and transition times in SketchUp:
- Increase Delay to hold on each scene longer
- Increase Transition for slower camera movement between scenes
- Lower the FPS setting for fewer total frames
Render is taking too long
Section titled “Render is taking too long”For faster preview renders:
- Enable Override Resolution and use a smaller size (e.g., 960x540)
- Enable Override Samples/Pixel and use fewer samples (e.g., 64-128)
- Reduce the number of scenes or shorten transition times
- Use Frame Range to render only a portion for testing
Best Practices
Section titled “Best Practices”- Plan your camera path: Sketch out your camera movement before creating scenes
- Use consistent timing: Keep transition times similar for smooth pacing
- Test at low quality first: Always do a draft render before the final version
- Save your SketchUp file: Scenes are saved with the model, so save before starting
- Check available disk space: A 1000-frame animation at 4K can use several GB of space
- Name scenes descriptively: Good names help you identify scenes in the animation table
- Back up your frames: Copy rendered frames to a backup location before video encoding